Mar 23, 2013

Rainbow Cupcakes (Eggless)


I am waiting for Spring. There is no better way to show it than these colorful cupcakes that I baked. I do not use artificial colours in the food I make and had no desire to use them in my baking. I had a basic idea of using natural foods to colour such as strawberry for red and blueberry for blue. So I scoured the internet to find a way to make more colours. I finally settled on carrots for orange, spinach for green, strawberry for red and blueberries for blue. These ingredients when juiced and added to the batter would impart the respective colours to the batter but not so much flavour as the quantity they are used in is very less. So the cake is going to taste like cake. I must tell you that the colours are not going to be neon bright when you use natural foods. They are going to be pastel shades but that is what I really like. My daughter loved the muted colour combinations as well and I had to fend her off in order to take pictures first. At this juncture I must say that she is the most encouraging person in my life and the enthusiasm is rubbing off on the hubby these days. He is open to being the guinea pig more often than not!

I used a basic vanilla cupcake recipe that I have made before. The only difference is to reduce milk by 2 tbsp so that 2 tbsp of different coloured juices can be added to the batter later.

Rainbow Cupcakes

Servings: 10 regular sized cupcakes
Prep Time:  45 mins  Cook Time: 18 mins

Ingredients 

Basic Vanilla cupcake batter (minus 2 tbsp milk)

To make coloured batter

1 cup grated Carrot
1 cup Spinach (I used Fresh)
1 cup Strawberries Fresh/Frozen (I used Fresh)
1 cup Blueberries Fresh/Frozen (I used Frozen)

Instructions 

Making the colours

Orange Colour
Juice the grated carrot with 1 tbsp of water. I used a regular Indian mixer to do this.
Strain the carrot juice to get the fibrous part out.
Keep 2 tbsp of orange juice aside.
Green Colour
Juice the spinach leaves with 1 tbsp of water
Strain the spinach juice.
Keep 2 tbsp of green juice aside.
Red/Pink Colour
Juice the strawberries with 1 tbsp of water
Keep 2 tbsp of red/pink juice aside.
Blue Colour
Place frozen blueberries in a microwave safe bowl and microwave in 30 second intervals till the blueberries burst and the juice starts oozing out. It took me 3 intervals.
Allow it to cool.

Strain the blueberries juice.
Keep 2 tbsp of blue juice aside.

Putting it all together


  1. Divide the basic Vanilla cupcake batter into 5 cups. I scooped out 4 heaped tsps per cup. 
  2. To the batter in the first cup add 1 tbsp of carrot juice and mix well to get orange coloured batter.
  3. To the batter in the second cup add 1 tbsp of spinach juice and mix well to get green coloured batter.
  4. To the batter in the third cup add 1 tbsp of strawberry juice and mix well to get pink coloured batter.
  5. To the batter in the fourth cup add 1 tbsp of blueberry juice and mix well to get blue coloured batter.
  6. Keep the batter in the fifth cup uncoloured. This can be used to improve consistency in the other batters or to get a cream layer in the cupcake. 
  7. Add more juice to improve colour adjusting the consistency so that it doesnt become watery. 
  8. There are  many ways of making the cupcakes clourful. 
  9. Preheat the oven to 350°F
  10. The easiest method is to layer different coloured batters one on top of the other in the cupcake liner.
  11. Alternatively place separators in the paper liner and pour different coloured batters in each section. 
  12. I started out making the separators using card. I made a 4 section one and a 3 section like that. But I found it problematic because the batters bled into other sections easily.
  13. Then the hubby gave an idea which turned out to be brilliant. Use crackers/biscuits as dividers. I had Parle-G gluco biscuits on hand and used them. I got 2 sections and 4 section ones using this method. 
  14. Whatever the method fill the liners to 3/4 full and bake at 350°F for 18 minutes. 
  15. Cool the cupcakes in the pan for 5 minutes before removing them onto a wire rack and allowing them to cool completely. 
  16. Decorate with frosting or ganache as desired. The cupcakes turned out so wonderfully coloured that I did not want to cover that up at all.

Update 8th Apr 2013 - Submitted this recipe as a celebration of everything colour to a contest hosted by Manjula for creative desserts for Holi/Easter. I won! ;)

Mar 21, 2013

Eggless Vanilla Cupcakes with Chocolate Ganache


Cupcakes are an all time favourite. What could get better than them? Yes, mini cupcakes! These bite sized wonders are easy on the eye and in the mouth.


That day my whole intention of baking cupcakes was to frost them. I wanted to get it right this time after a huge flop show the previous weekend.
I had made a pineapple cake and had attempted to make frosting at home. The catch was that I was planning to make cream frosting without an electric beater. I did my youtube and google searches and found enough encouragement there to fulfil my desire to make frosting from scratch without the beater. It turned out to be a 2 hour high voltage drama. I must have given off sparks by the end of it going by the amount of focus and friction the whole act of beating by hand was producing! Although I dint lose hope by the end of the first hour when the liquid that I was beating steadfastedly remained in the same state, I threw the whisk into the sink by the end of the second one. Then I hit upon a brilliant idea of running it through my mixer and that resulted in churning the cream and butter back to nice butter. I did frost my cake with this buttery something and we did scrape it all (2 layers) off before eating the cake. Thus bringing to an end a saga that I am not about to repeat. And then I wrote to Sin-a-mon's Monika and she gave me the idea of making ganache.
Ganache has been an awesome discovery. I am going to experiment with different types of chocolate and post all about it here but my maiden attempt was with semi sweet chocolate chips and the heavy cream I had left over from my previously ghastly trial. I used the simple recipe from here.It gives a good idea on how one could use ganache to decorate cupcakes. And there are three different types - Glazing, Whipping and Piping. I did not want to Glaze since my family wouldnt like it so sweet. Whipping was out of question without an electric beater. So piping it was.This was my second time trying to pipe and the first time I did was just a whirl.


Getting back to the cupcakes on hand, this recipe is an absolute keeper. It is eggless and uses oil instead of butter. The texture of the cupcakes are dreamy soft and so delicate. It is easy to put together and with the right pictures it is easy to remember how to make them as well. I have had my share of tighter cupcakes or sunken ones, but this time I have got it right with the measurements mentioned. These cupcakes can be eaten without any frosting and would still taste great. Alternatively, a sprinkling of nuts on top or mixed inside would render a crunchy good flavour. Any kind of frosting would taste good on such a basic cupcake so its a base for creativity. I brought it with me for a party and got extremely encouraging feedback from the crowd that had gathered there. Many could not believe that it was eggless.


Eggless Vanilla Cupcakes with Chocolate Ganache

Servings: 24 Mini Cupcakes or 10-12 Cupcakes
Prep Time: 15 mins     Cook Time: 10-18 mins

Ingredients

1 1/4 cup All Purpose Flour
1 tsp Baking powder

1/4 tsp Baking soda
pinch of Salt
3/4 cup granulated Sugar
1 cup Milk
1/3 cup Oil
1 tbsp White Vinegar
1/2 tsp Vanilla extract
Nuts to garnish on top (Optional)

Basic Chocolate Ganache

12 oz Semi-sweet chocolate chips (1 bag of Nestle's)
1 cup Heavy Cream

Instructions


  1. Prehaet the oven to 350.
  2. Line cupcake tray with paper liners and keep aside.
  3. Stir together milk and vinegar and set aside for 5 minutes. The milk should be curdled by the end of it.
  4. Sift together the flour, baking powder, baking soda and salt and set aside.
  5. Once milk is curdled, whisk oil, vanilla extract and sugar into it till well combined and runny.
  6. Make a well in the center of the dry ingredients and pour the wet ingredients into it. Mix till smooth. Do not overmix. A little lumpy is fine as long as everything is mixed well.
  7. Fill into cupcake liner till 3/4 full.
  8. Sprinkle nuts on top if desired.
  9. If making mini cupcakes, bake for 10 minutes. If regular sized cupcakes then bake for 16-18 minutes. A skewer inserted into the cupcake should come out clean and that tells you they are done.
  10. Remove from oven and cool in pan for 5 minutes before transferring to a wire rack and allowing it to cook completely.

Decorating the cupcake with Ganache

  1. Cool the ganache for atleast an hour in the fridge for it to thicken to piping consistency.
  2. Fill a piping bag with the ganache and press down towards the nozzle so that air gaps are eliminated. This aids piping to flow out seamlessly.
  3. I used a small round tip (not familiar with the nomenclature) and made my own twirly whirly designs by squeezing on the piping bag with my left hand and guiding the tip with my right hand.


Mar 20, 2013

Whole Wheat Calzone

Calzone is a God-sent for fussy eaters. It is basically a turnover or a folded Pizza and is extremely popular in my house because of the easy eating. Unlike a pizza there is not much fear of the topping falling off the base and then having to eat the whole thing like bread with a side dish. It's compact shapeis great for being grabbed in one toddler hand while jumping to in front of the TV to the tune of M-I-C-K-E-Y  M-O-U-S-E.
Use whole grains in the dough, get really creative with the veggies and bake to make it a healthy brunch/snack/dinner and enables the delivery of a lot of nutrition. Make it bite-sized and it can become an entree to a big meal. I am sure it would provide a surprise element to the lunch box.

The calzone also reminds me of the Kadabu that we make during Ganesha festival and is tradionally covered with a rice flour sleeve. And somewhere that connection works very well on our apetite to devour this tasty sandwich. The fact that I dont have to remind my daughter to eat at every bite, makes this my most favoured recipe. It is easy enough to make but I am yet to learn about dough storage.


I made it on a busy day and I had a couple of things already going in the kitchen. Not much effort and I like the fact that I dont have to pre-cook anything!

Whole Wheat Calzone

Servings: 10 Calzones     
Prep Time: 3 hrs (including rise time)    Cook Time: 20 minutes

Ingredients

1/2 Medium Onion (I used sweet onion)
16 Cherry tomatoes (or 1 regular tomato)
1/2 Capsicum
1 Jalapeno
1/2 cup Corn (I used frozen)
1 cup Tomato sauce (preparation instructions in this post)
Salt
Black Pepper powdered
Spice Mix of choice
Mozzarella Cheese - as much or as little as desired

Instructions


  1. Prepare the pizza dough as per instructions here.
  2. To make the suffing, mix all the vegetables, salt, pepper and any other spice of your choice in a bowl. Keep aside. 
  3. Once the dough has risen, pull out a good sized ball of dough and roll it out on a floured surface with a rolling pin
  4. Brush the dough circle with tomato sauce.
  5. Pile on a proportionate quantity of stuffing onto the rolled out dough making sure that it lies on the bottom half of the dough. Leave some space around the edges.
  6. Optionally, pile on mozzarella cheese on top of the veggies.
  7. Fold the top half over the bottom half and seal the edges by pressing the edges together all along the semi-circle.
  8. Make indentations along the edges with a fork.
  9. Keep the stuffed dough in a baking tray, covered with a towel or cling wrap, and allow to rise in a warm place for around 30 minutes.
  10. While the stuffed dough is rising preheat the oven to 350
  11. Bake at 350 for 10 minutes and turn it over and bake for another 5 minutes to get them evenly browned on both sides.
  12. Serve calzones warm, especially important if kids are going to munch on them.
Sending this to Healthy Foods for Healthy Kids – Italian Dishes and Nithu’s page


Mar 18, 2013

Nipattu (Thenga Vadai)

 
It was a cloudy Saturday and I was on a roll in the kitchen. I was already baking and decided to throw in a fried snack to perk up our palate. One of my most persistent memories of childhood are of eating pakoda and other fried snacks on rainy days sitting snugly on the divan (settee) under a blanket with a Hardy Boys book in hand and with Kishore Kumar songs to boost if my dad was in town. It is not every day that I deep fry with puris as well making a rare appearance in our house. But I definitely dont want V to miss out on the comfort of such a memory.
 
 
I was deciding between Kodbale (where I realise now that I dont have a pic of the finished product!!) or Thenga Vadai (also called Nippattu in Kannada) and T decided on Nippattu. Nippattu is traditionally a "thindi" or a snack made for Gokulashtmi but my mom is known to make it for many special occasions and sometimes on just a whim. The recipe I have used here is hers and is time tested for perfection. On all the previous occasions that I have made it, I have always added onion to the batter which gives it a very tasty MaddurVada-ish twist. This time however I went ahead and made it without the onion. I ended up with a good number of pieces to bring it along for a party that we were invited to in the evening. And I am happy to say that it got me a lot of praise and most of them thought it was store-bought till they came to know I had made it at home.


 Nippattu, also called Thenga vadai in Tamil

Servings: 30 pieces
Prep Time: 1.5 hours   Cook Time: 30 - 45 minutes

Ingredients

1 cup Rice flour
1/4 cup All Purpose Flour (APF)
1/4 cup Fine Semolina
1/4 cup Dalia
1/4 cup Groundnuts
1/4 cup grated Dry coconut or Copra
A pinch of asafoetida
Few Curry leaves
6 tsp Oil (to mix in batter)
2 tsp Red chilli powder (or to taste)
1/2 cup Water
Salt to taste
Oil for frying

 Instructions


  1. Dry roast the dalia and grind it into a fine powder.
  2. Dry roast the groundnuts, remove the skin off and grind it into a coarse powder. I used readily roasted, halved and peeled groundnuts which made this step easier.
  3. Dry roast the APF till warm to the touch.
  4. Now mix all the dry ingredients together. This is the point where salt and spice should be ratified.
  5. Add in the curry leaves as well.
  6. Add the 6 tsp of oil into the dry ingredients and mix well with hand till crumbly.
  7. Add water, a little at a time, and continue to knead till the dough forms a soft ball.
  8. Keep the dough in a covered container and allow it to sit for an hour.
  9. After an hour, heat oil in a deep heavy bottomed vesel. Spread a small polythene sheet on a flat surface and lightly oil it.
  10. Pinch off table-tennis size balls of dough and flatten it to a disk on the polythene sheet. Fingers or the base of a glass could be used for this.
  11. To get really crisp Nippattu, the dough disk needs to be real thin.
  12. Prick holes into the disk with a fork to prevent it from ballooning when it is fried
  13. Peel the disk off the plastic sheet and slide it into the hot oil.
  14. Fry till golden brown on medium heat.

Mar 17, 2013

Bisi Bele Quinoa (Quinoa Lentil Porridge)

Quinoa, as I have read, is an excellent source of protein, fiber, iron, calcium, antioxidants and omega-3 fatty acids making it a super-food. I have tried to incorporate this superfood into our dietary routing with the Quinoa Pulav.


Since lentils are also important in the daily diet, I decided to mix the two and discovered a very tasty dish.


Quinoa Lentil Porridge

Servings: 3 cups
Prep Time: 30 mins Cook Time: 15 mins

Ingredients 

1 1/2 cups Quinoa
6 1/2 cups Water
1 cup Toor Dal
1 cup Veggies of your choice (I used Snap Peas and Parsnips)
1 medium Onion
1 medium Tomato
Bisi Bele Powder
1 tsp Mustard seeds
1 tsp Jeera
Coriander
Curry leaves
2 Red Chillies
Salt to Taste

Instructions 


  1. Cut the onion and tomato into 1 inch pieces and set aside. 
  2. Wash quinoa thoroughly under running water. I do this atleast 6 times to get rid of dirt and any smell thereafter. 
  3. Pressure cook quinoa with 3 cups of water. Set aside. 
  4. Wash Toor dal thoroughly under running water. (I do this 3 times)
  5. Pressure cook the lentil along with the veggies (except Onion and Tomato) with 2 cups water
  6. Heat oil in a heavy bottomed vessel and add mustard seeds to it
  7. When the mustard splutters, add jeera, curry leaves and red chillies
  8. Now add cut onion and sautee till transluscent. 
  9. To this add the cooked dal and veggies with some water and bring to a boil. 
  10. Add the bisi bele powder, tomato and salt and continue to cook.
  11. Finally stir in the cooked quinoa and bring to a boil. Add additional water as required to desired consistency. 
  12. Garnish with chopped coriander.
  13. Serve hot. 

Mar 16, 2013

Basic White Dinner Rolls


Since the time I discovered that I too can conquer yeast, I have this feeling of having reached square 1 of infinity. The possibilities are endless. I am constantly thinking about what to bake with it. Some might call it obsessive but it is a great stress buster especially to get my mind away from the everyday happenings around me. Baking bread does to me what attempts at meditation do not. Complete focus and attention are naturally there.
The past weekend was an over zealous baking marathon. It was also extremely therapeutic in a way that I ended up totally satisfied with all that I was able to do. I had two things to bake. The first one, dinner rolls, was for sheer repeatability. I wanted to be sure that the first time I got it right was not by fluke and I could replicate the feat with ease everytime. The second one on my list was a Sweet Chariot-ish Pineapple cake complete with the frosting. It will suffice to say that I had my share of success and failure (respectively) but the sheer pleasure and relaxation that the process provided, left me with a whole lot of good cheer.
Baking bread has helped me fight the cakes and cookies fatigue. It has gotten me over the anguish of baking something sweet which the family wont eat.


Baking breads or buns is time consuming.... for the dough. There is very little one has to do in the four odd hours that it takes to make apart from wait for it to rise. So one has enough time to conjure up the accompaniment. In my case I decided to turn the rolls into the pav of pav-bhaji. Given the quantity of the dough I got after the rise, I decided to try my hand at shaping pretty rolls as well. I got a braided one, a knotted one and also a rolled one. I dint really look at any making videos or techniques to make the different shapes. I used some photos online as my inpiration.


Basic White Dinner Rolls

Servings: 15 regular medium sized rolls
Prep Time: 4 hrs (including rise time)      Cook Time: 25 mins

Ingredients

3.5 cups all purpose flour
2-1/4 tsp Active Dry Yeast
1/4 cup lukewarm Water (Microwave for 20 secs)
1-1/4 cups milk
3 tbsp Butter
2 tbsp Sugar
3/4 tsp Salt

Instructions

  1. Stir in the yeast and sugar in lukewarm water and let it rest for around 10 mins. If the mixture does not froth up discard the liquid and start over again.
  2. Soften the butter completely by leaving it out on the counter for sometime. Or Microwave it for 20 seconds to get it soft.
  3. Mix the butter and milk into a smooth mixture.
  4. Add the yeast mixture to the milk mixture
  5. Add salt to the liquid and mix well.
  6. Now add the flour one cup at a time into the liquid and mix well.
  7. By the time you add the 3rd cup, the mixture starts to form into a dough.
  8. Start kneading the dough by hand (It is going to be very sticky at this point)
  9. Add small amounts of flour and keep kneading till the dough starts to unstick from hands and forms into a smooth ball.
  10. Continue to knead for another 10 minutes or so.
  11. Grease a bowl (double the size of your dough ball) and place the dough ball in it and roll it around so its covered all around with the grease. Cover with a plastic cling wrap. (I think you can use a clean cloth as well as long as the bowl is well covered.)
  12. Also I rubbed the paper, the butter was wrapped in, all over the bowl to grease it. A few drops of oil could also be used.
  13. Place the bowl in a wam place and let it sit for 2 hours to enable the dough to rise. Top of the fridge works best for this.
  14. After 2 hours, the dough would have risen to twice the size.
  15. Softly knead down on it with knuckles and then shape it in whichever way you like (See instructions for Shaping the Roll below)
  16. Place the rolls in the tray that would use to bake ensuring there is atleast 1.5 inches of space around each roll.
  17. Cover the tray with plastic cling wrap and keep the tray in a warm place to rise for 1 hour. Again top of fridge.
  18. Preheat the oven to 350°F in the last 15 minutes of the second rise.
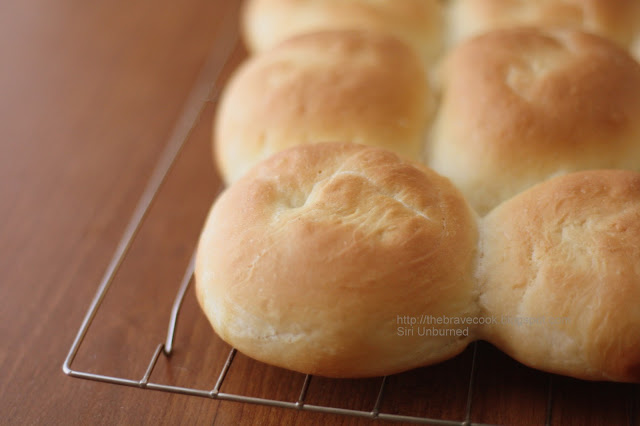
  19. After 1 hour, the rolls would have risen very nicely and would have stuck to each other. Looks like one big pull apart roll.
  20. Bake in the preheated oven at 350°F for 20-25 minutes till the top is a nice golden brown. Mine were done in around 23 minutes.
  21. Serve warm or slice it and warm it up on a skillet before serving

Shaping the rolls

1) Regular roll


  • Flatten the dough to a 1 inch thick square. Using a rolling pin is easier for this. If the dough tends to spring back, leave it for a couple of mins before rolling again.
  • Cut the square into equal sized squares using a knife on the vertical and horizontal axes.
  • Using your palms, shape each small square (2 inches) into a ball
  • Place it in the baking tray.
2) Braided roll


  • Pinch off 3 table tennis ball size ball from the dough.
  • Roll each ball between palms to elongate the ball into a 4 inch long rope (1/2 inch diameter)
  • Place all the 3 ropes beside each other and braid them like you would hair.
  • Pinch the top edges of the ropes together and the bottom edges together
  • Place it in the baking tray
3) Knotted roll


  • Pinch off a ball the size of a golf ball, from the dough.
  • Roll the ball between palms to elongate the ball into a 6 inch long rope (1/2 inch diameter)
  • Make a simple knot with the long roll
  • Loop the end of the rope coming from below, stick it on top of the knot.
  • Loop the end of the rope coming out from the top and stick it below the knot.
  • Place it in the baking tray
4) Rolled


  • Flatten the dough to a 1/2 inch thick rectangle
  • Cut a rectangle around 4 inches * 2 inches from this
  • Starting from a smaller side roll lightly till the end of the length.
  • Place it in the baking tray

Mar 6, 2013

Menasu Saaru - Pepper Soup - A tonic for cold and cough


It has been a week of insistent cough and drippy noses at my home thanks to the drastic weather changes that abound. T needed something soothing for his throat and asked me to make Menasu saaru that his mom makes. I had never made it before but since a request for a particular dish comes rarely from him I decided that I had to take the plunge. 
With a jog down his memory lane to remember what aunty, as I call her, lovingly puts in it and some searching on the internet, we came to a conclusion on what needs to go into this soup. 
It had to have pepper because the soup is named after it and also because of the antioxidants which relieve cold symptoms, dry cough and congestion. Cumin had to be in it for all its antiseptic properties which would aid in fighting against the cold. Garlic for the nice taste it would imbue into the concoction and also for its expectorant like effects for cough. Curry leaves for its wonderful soothing nature and also anti-bacterial nature. Red chillies for taste and maybe it helps get the bad stuff out. 

My mother makes a different kind of rasam for such occasions. Its called Molaga Chatambd which also translates to Menasu saaru or Pepper soup. But the taste is completely different although the curative properties are similar. I even store the powder on hand to use readily. I will post about it later. The

Menasu Saaru

Serving : 3 cups
Prep Time : 15 mins     Cook Time : 30 mins

Ingredients

2-inch ball of Tamarind
1-inch cube of Jaggery (use more if you like it sweet)
3 cups Water
Salt to taste

For the Seasoning

2 tsp Black Peppercorns
2 tsp Cumin seeds
2 cloves Garlic pods
Handful of Curry Leaves
2 Red Chillies
2 tsp Ghee

Instructions


  1. Soak the tamarind in warm water for around 15 minutes. 
  2. Once the tamarind softens, squeeze it further to get all the juice mixed up with the water. Do this for around 5 mins to extract all the juice. 
  3. Filter the tamarind juice either with your hand (fingers acting as the sieve) or use a tea filter (needs a lot of patience. 
  4. Place a heavy bottomed vessel on medium heat, add 3 cups of water and add the filtered tamaring juice to it. 
  5. Add the jaggery into it and allow it to boil for around 20 - 25 minutes. 
  6. As you boil, add more water if it becomes too tangy for your palate. 
  7. Add salt to taste.

To make the Seasoning


  1. Peel the skin of the garlic and crush it. I placed the garlic pod on a cutting board, placed the flat side of my knife on it and banged on it with my wrist. 
  2. Coarsely crush the peppercorns. I used a heavy stone against the peppercorns on my cutting board for lack of pestle and mortar. 
  3. Coarsely crush the cumin. Thank me for the heavenly smell in your kitchen after this. 
  4. Break the red chillies in half.
  5. Heat the ghee in a small wok on medium heat and add the pepper, cumin seeds, garlic, red chillies and curry leaves. Let it fry while you sti.
  6. Pour the seasoning on top of the boiled soup.
  7. This concoction can be had as soup or mixed with rice. In either case eat it while its eat. 


Mar 4, 2013

Whole wheat Veggie Pizza with 7 spice base


To make the perfect pizza has been one of my life quests ever since we landed in the USA and I had on hand a great big oven. There have been quite a few experiments and not all of them have turned out palatable. There have been thick crust pizzas with crusts so thick that we got exhausted chewing on them. There have been thin crust pizzas which have been so thin that we were hungry even after consuming 2 10-inchers. There have been pizzas where the topping just dropped off and we ended up eating the whole thing like chapathi and curry. There have been cheese-less pizzas for the days when I felt extra conscious of the dent I was making in Mother Earth. There have been sauce-less pizzas for those lazy experiments. There have been over garlicky pizzas and there have been bland ones too. The highlight and turning point arrived when one weekend T was craving Rosatt's pizza and I offered to make it at home instead. Immediately an aghast kiddo looked straight into my eye and explained "But amma, appa meant he wants to eat yummy pizza".
Now I am not complaining about the duo who are the guinea pigs in all my experiments. They are real sweet and supportive but I guess there is only that much they can take when it comes to a mood uplifting food like pizza. 
I am now happy to announce that I seem to have stumbled upon the best recipe for pizza. I was inspired by this post of theKitchn. Mostly I used the technique of baking specified and was charmed by the fact that I had only vessel to wash. Almost making a pizza a one-pot dish!

I do like to make the pizza base at home because that gives me more control over what goes into the end product. I have tried to make this with 100% whole wheat flour but the resulting base was more like cardboard. I need to give it another try but for now I use half and half whole wheat and all purpose flours. I have also tried making the base with Rapid rise yeast - without proofing and setting aside for the rise and have been thoroughly disappointed with the end result. The base had a over powering yeasty smell owing maybe to the fact that the recipe called for using the whole packet of yeast (around 2.5 - 3 tsp). The base did puff up in the oven but not to my liking. After most of my failed attempts with rapid rise, I gathered up enough courage to get Active Dry Yeast and proof it. Its not that complicated and you get used to what to expect after a couple of times. 


Whole wheat Veggie Pizza with 7 spice base

Servings : 2 9-inch pizzas 
Prep Time: 2.5 hrs (including 2 hrs rise time)   Cook Time: 10 mins * 2

Whole wheat Pizza base

Ingredients

1 cup Whole wheat flour
1 cup All purpose flour
1.5 tsp Salt (or to taste)
1 tsp Active Dry Yeast
3/4 cup warm water (I microwave water for 20 secs on high)

Flavour variations to add into the dough (that I have tried)

- Dried basil leaves 
- Italian spice mix 
- Black pepper powder
- Indian spice mix - Cumin powder, Coriander powder, Carrom powder, black pepper powder
- All of the above (This is what I have used in my pizza here)

Instructions to make the base

  1. Stir in the yeast into warm water along with sugar. Let sit for around 10 minutes. In the meanwhile the water should become frothy and a little bubbly. The surface of the water will look bulged. This process is called "proofing". 
  2. Mix all the dry ingredients together.
  3. Add the yeast water to the dry ingredients and mix till the dough comes together. Use water as much as required, adding little at a time. 
  4. Do not knead too much. 
  5. Once the dough comes together in a ball, keep in a lightly oiled bowl and cover it with a plastic wrap or a lid.
  6. Keep the covered bowl in a warm place for 2 hours for the dough to rise. Top of the refrigerator seems to work the best. Hot air rises!

Instant Pizza sauce

Ingredients

2 Tomatoes / 5 heaped tsps of unfavoured natural tomato paste
2 garlic pods
1/2 tsp Salt
1/2 tsp black pepper
2 tsp Olive oil or Vegetable oil or Canola oil

Instructions

  1. Grind all the ingredients together adding 1 tbsp of water if required

Pizza Toppings

Cut up the following and more and keep aside
1 Medium Onion -chopped Julienne
1 Medium Capsicum - cut thin lengthwise
2 Medium Tomatoes cut into small pieces / 10 Cherry Tomatoes halved
1 cup sweet corn
12-16 thin slices of Jalapenos
2 cups Mozzarella cheese


Putting it all together

  1. Once the dough has risen, gently press into the dough and smooth it out into a ball. Do not rough up the dough.
  2. Preheat the oven to 450°F
  3. Divide the dough into two parts and keep one of them covered till the first one is done.
  4. Cut 2 parchment paper  squares of dimension 10-inch * 10-inch
  5. Keep a cookie sheet or inverted cake pan ready to bake the pizza. I don't own a pizza stone so cant really say what to do with that. Inverted cake pan makes it easier to cool and serve. 
  6. Now here is where I did it differently - Keeping one of the balls of dough on one parchment piece, flatten it by pressing it by hand. I did not need extra flour since I worked on parchment (cleaner). Continue to keep it on the parchment paper and roll it out with a rolling pin to desired thickness. I could get a near 9-inch circle at 1/4-inch thickness. Again be nice to the dough, it takes 5 minutes.  
  7. Cut the paper around the edge of the base as close to it as possible. 
  8. Now scoop half the sauce onto the center of the base and spread it outward with a spoon.
  9. Spread the toppings you have ready and sprinkle cheese right at the top.
  10. Slide the whole thing along with the paper onto the cookie sheet or inverted cake pan.
  11. Bake in the oven for 5 mins. 
  12. At this point remove the pizza from the oven and slide the paper out from under it. 
  13. Continue to bake for another 5 mins. 
  14. Remove from oven and cool on a wire rack for 5 minutes before serving.
  15. Repeat the process with the second pizza. 
My pizza is being YeastSpotted!
Related Posts Plugin for WordPress, Blogger...