Showing posts with label South Indian. Show all posts

Sep 15, 2013

Ragi Rotti (Finger Millet flatbread)


If there is one thing which is quintessential Karnataka food it would have to be Ragi. Karnataka is one of the biggest producers of Ragi in India. And no wonder that almost every kannada household would stock it in their pantry to readily whip up Mudde (cooked Ragi ball) or Rotti (Ragi flat bread) best eaten with Bussaru or Chutney respectively.


I prefer the Rotti over Mudde and make it often at home. It is one of the best after school snacks for kids to restore their energy and to provide them with nutrition without fuss. I tend to flavour it with onion, green chillies, coriander leaves and optionally spices. It is easy to make and easy to eat and is one of the healthiest dishes to be had.


Ragi Rotti (Finger Millet flatbread)
Servings: 8 Rottis
Prep Time: 10 mins Cook Time: 5 mins (for each Rotti)
Ingredients
2 Cups Ragi flour
1 Medium Onion
2-3 Green Chillies
A bunch of coriander leaves
1 cup Spinach leaves
1 cup Water
1 tsp Cumin powder (optional)
1 tsp Coriander powder (optional)
Salt to taste
Instructions
Cook the spinach leaves (Microwave or stove-top) and grind to a fine paste.
In a bowl mix together flour, salt and spices.
Add to this minced onion, green chillies, coriander leaves and mix well.
Add in spinach paste till crumbly.
Add water, a little at a time, to make a soft dough.
Keep aside covered for 30 mins if desired.
Wet a small piece of cloth (handkerchief) completely and squeeze to remove excess water
Spread it out on a flat surface.
Place a dough ball on the wet cloth and flatten it using fingers dipped into water
Slide the cloth along with the flattened dough and flip it onto a hot skillet
Drizzle  oil around the flattened bread and cook on both sides.
Tip :- If the flour on any part of the bread shows up white, it isnt cooked. Spread a drop of oil or water and cook the spot. 

Jun 27, 2013

Sweet Potato Curry - Spicy with a hint of sweet


Sweet potato supposedly has lesser calories, more fiber and more nutrients packed in it than the white potato. But as with a lot of vegetables the debate goes on. Debate not withstanding both the spuds are loved by my family The sweetness of the sweet potato is often off-putting for some in my family which forces us to choose the white variety many times but with the right kind of treatment the sweet potato can provide a stiff competition.
Its an easy curry to prepare and goes well with chapathis but I love it most with rasam rice. Great for the lunch box of a picky eater too.

Sweet Potato Curry - Spicy with a hint of sweet

Servings: 2 cups curry
Prep Time: 15mins     Cook Time: 10 mins

Ingredients 

4 sweet potatoes
1-2 tbsp Jaggery
1/2 tsp Mustard seeds
4-5 Green chillies
1 tsp Cumin seeds
2 tsp Chana Dal
1 tsp Urad Dal
Few Curry leaves
1 bunch Coriander leaves
4 tsp Oil
Salt to taste
3-4 cups Water

Instructions


  1. Boil the water, add some salt, turmeric and put in sweet potato halves.
  2. When the sweet potato is nearly cooked add in  the jaggery and continue to cook till sweet potato becomes tender to the touch. 
  3. Remove the sweet potato halves and peel the skin off and mash it. 
  4. Heat the oil in a heavy bottomed vessel and add mustard seeds
  5. When the seeds sputter add the cut green chillies, cumin seeds, chana dal and urad dal and fry for a couple of minutes. 
  6. Add in the mashed potatoes and curry leaves and mix well.
  7. Adjust the salt as necessary. 
  8. Switch off the stove and garnish with coriander leaves. 
  9. Serve with chapathis or rice. 

Gunta Pongana/Guliappa/Paniyaram


While most of us occasionally yearn for dishes from our childhood nothing compares to my hubby pining for what his grandmother used to make for him. Ammaji, as we call her, may be old and frail today but her mind is as sharp as it used to be when she was in her hay days. She used to run an Anganwadi in her hometown, which was on the Karnataka Andhra border, and still remains a forward thinker. Her social work often kept her occupied for many hours of the day and consequently she was not the one cooking all the meals in her house but what she made, I am told, had the golden touch. T and his brother used to swoop in on the town during their summer vacation and, owing to the popularity of their grandmother and the position of their grandfather, were often treated as royalty. The doting grandmother gave them special attention and ensured she spent ample time with them while treating them to all kinds of delicacies. One of the most cherished dishes is the Gunta Ponganalu (or Pongadalu) that she is an expert at.
Coincidentally, I have a related story with this dish from my childhood. For the first few years of my life we lived in Hyderabad so my mom was well exposed to local cuisine and she picked up making this dish although she calls it Guliappa. It was one of the few snacks with the dosa batter that I absolutely loved. (Dont ask me why I did not like idlis and dosas, growing up!!)

Gunta, literally meaning ditch in Telugu, and Ponganalu (or Pongadalu) which I think means round balls is an extremely addictive and a very tasty way of using idli and dosa batter. The only hitch to making this dish is that there is a special pan required to make this. If you are equipped with the pan making this snack is a breeze.

We took my m-i-l who is currently visiting us to a trip around a store here a couple of weeks back and much to my delight and T's disbelief, we found an Ebelskiver pan which we knew we could use to make Gunta Ponganalu! We brought it home and that very weekend, armed with left over idli batter this amazing dish came to light in our kitchen. Such a happy coincidence and fun ending to a long story here.


I made this with idli batter but I know that it should turn out very good or even better with the dosa batter so long as it is thick and not too watery. I also had some dill handy and I popped it in and I must say that was the best decision. The aroma was heavenly and it gave the dish a mouth watering flavour.


They make for excellent snacks at home and also are very good for the lunch box.

Gunta Pongana/Guliappa/Paniyaram

Servings: 16 Gunta Ponganalu
Prep Time: 5 mins (if Idli batter ready)    Cook Time: 8 mins for each batch (16 minutes totally)

Ingredients

2 cups Idli batter
1 Medium Onion
1 tsp Cumin powder
1 tsp Coriander seed powder
3 Green chillies
A bunch of Dill leaves (or Coriander leaves)
Salt to taste

Instructions

  1. Cut onion, green chillies and dill leaves finely and add to the idli batter along with the spices and salt. Mix thoroughly
  2. Smear oil into each pit on the Gunta Ponganalu pan or Ebelskiver pan. If using nonstick pan a drop of oil smeared into each pit will do. If not, then 1/2 tsp of oil needs to be smeared into each pit.
  3. Heat the pan on the stove at medium heat.
  4. Drop spoonfuls of batter into each pit, to reach 3/4 the height.
  5. Wait till the bottom side of the batter starts to brown and then scoop it up with a spoon and flip it over. Drop some oil into each pit from the sides. This will enable the other side to cook and get rounded.
  6. When the bottom side is browned remove from pan. At this time the batter should have turned into a fried well rounded and slightly browned ball.
  7. Gunta ponganalu are dense on the outside and airy and fluffy on the inside.
  8. Serve with coconut chutney or spicy chutney powder.

Jun 4, 2013

Pesarattu (Moong Dal Dosa)


Today was a one of a kind foodie day. It started with bread for breakfast, idli for lunch and dosa for dinner. The dotzy was finally confused and called her dinner brunch! I have been inundated with whole green moong dal (green gram) after I ended up buying it every time I visited the Indian grocery store over the past two months. I could not remember that I had bought it already. I have been asking friends to help me use it in bulk and one of my sweet friends S suggested Pesarattu. I thought that was going to be a long drawn process and procrastinated on the idea till another friend S told me how easily it can be done. The clincher was the fact that this is an instant dosa mix (if you have soaked dal handy) and I love a no prep recipe.

The word "Pesarattu" is derived from "Pesaru" which is what Moong dal is called in Telugu and "Attu" which is what Dosa is commonly called in Telugu. Pesara Pappu is what the yellow split moong dal is called. So Pesarattu is simply a moong dal crepe or dosa. And might I add a yummy one at that. The only prep required for this dosa is soaking of moong dals for atleast 6 hrs or even overnight. If the moong beans have sprouted it is healthier.

The beauty of this recipe is that you can add flavours as you please. Add in mint to get a fresher flavour or coriander to get the friendly homely taste. Add in onions and carrots to enhance the flavour.

I think this batter may work well with tomato as well although we might have to spread the batter thicker and sprinkle fine cut tomato pieces on top while on the skillet. I am also going to try this with avocado the next time and avoid rice flour altogether.

Pesarattu (Moong Dal Dosa) 

Servings: 20 Dosas
Prep Time: 8 hrs (soak time) + 10 mins for grinding Cook Time: 30 mins

Ingredients 

3 cups sprouted Moong dal
1/2 cup Rice flour
1/2 cup Water
1 1/2 tsp Jeera powder
4 Green chillies
A bunch of Coriander
1 Medium sized Onion (optional)
1 Medium sized Carrot (optional)
Salt to taste

Instructions 

Grind all the ingredients together till you get a fine paste. Add more water as required to make it easier to grind and to get it to a spreadable batter consistency.
Add finely chopped onions and grated carrot to the batter and mix well. This step is optional.
Heat a skillet on medium flame.
Pour a ladle of batter in the center of the skillet. Using the back of the ladle (it has to be a heat resistant material ofcourse) spread the batter outward in one continuos circlular motion without lifting the ladle away.
If onion and carrot have been added, be slower with the spreading as it the batter is denser and it may clump.
Allow the dosa to cook till nicely browned on the bottom.
Using a large heat resistant spatula flip the dosa and cook it for a couple of seconds on the other side.
Serve dosa hot with Chutney and / or Chutney powder.

Jun 2, 2013

Tomato Puri (not the chaat)


Puris are my darling dotzy's all time favourite breakfast and today being a Sunday we decided to feast on them. 

I had seen that Rafs was hosting the Tried and Tasted event this month and the featured blog was Maayeka. Incidentally I had come across this blog a couple of weeks ago and one of Mrs. Anjana Chaturvedi's recipes, the tomato poori, had caught my fancy. I tried it out today and it was super yummy. I had to really scramble to get pictures before they got devoured. The accompaniment to the puris was the most kid friendly side dish, onion and potato curry. 

The original recipe can be found here. The only deviation I made was to not add the baking soda. 

Tomato Puri

Servings: 16 puris
Prep Time: 15 mins Cook Time: 30 mins 

Ingredients

1 1/2 cups Whole wheat flour
1/2 cup Fine Semolina (Rava)
1 tsp Cumin powder (or use Cumin seeds)
1 tsp Red chilli powder
1 1/2 tbps Mint leaves (finely chopped)
1 Tomato pureed
Salt to taste
Oil for deep fry

Instructions 


  1. Mix the flour, semolina, cumin powder, red chilli powder, salt, mint leaves and oil. 
  2. To this add the tomato puree and mix
  3. Knead and form a dough, adding a little water if required.
  4. Cover and keep aside for 30 minutes
  5. Heat the oil till it becomes hot enough to fry.
  6. Pinch off dough and roll it in your hands to form 1 1/2 inch diameter balls
  7. Using a rolling pin, roll the ball out to a 4 inch wide dough circle.
  8. Slide this into the hot oil and fry till golden brown. 
  9. While frying, gently patting the poori with a slotted spoon while enable it to puff up.
  10. Drain excess oil, remove the poori and place it on a tray covered with paper tissue. This helps absorb any excess oil. 
  11. Serve tomato puri hot with onion-potato curry or chutney. 

How to Puree Tomato

  1. Boil 3 cups of water
  2. Make slits in the tomato and immerse it in the boiling water.
  3. Allow it to cook in the boiling water for around 4 minutes till soft
  4. Remove from hot water and immerse it in cold (room temperature) water for 5 minutes
  5. The above process is called blanching.
  6. Remove the skin of the tomato in a thin layer
  7. Grind it to a puree in a mixer/blender. Do not add water while grinding.
  8. Use the puree in any recipe which requires tomato puree. 
Sending this to Tried and Tasted event being hosted by Rafs!


May 23, 2013

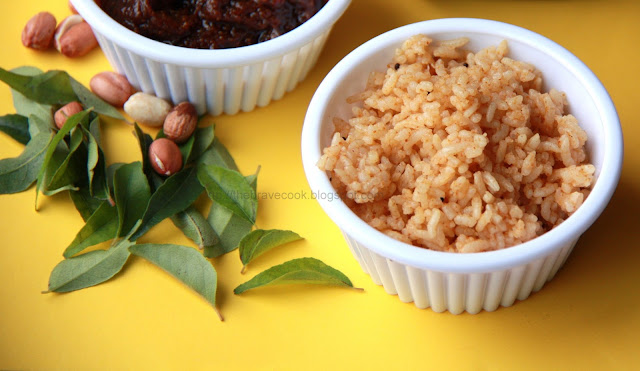
Iyengari Puliyogre Gojju


Raise your hand if you DONT love puliyogre. Raise if your hand if you DO. There I see more participation now!
Sometimes I feel the hubby married me only to be assured of constant access to this delectable dish which is so near to any Iyengari's heart. My mother has had a dream run because all she had to say was "Puliyogre" to have him at her beck and call. He also coaxed her to send some of her gojju with us to the US. But the only thing I do not understand in all this hullabulloo is why the hubby heats it before eating it. Ever heard of eating hot puliyogre but thats the only way he likes it! Pulioygre is the rice dish of choice on any festival day or special occasion in an Iyengari house. An Iyengari wedding caterer is judged solely on his Puliyogre making calibre to get repeat contracts. The judgement is even passed as a whisper throughout the wedding hall so people who come in later batches to eat are already equipped with the knowledge of whether to skip all else to conserve space for the Puliyogre or to avoid it entirely.

Puliyogre can easily be the only dish for a meal or one of the main course dishes in a bigger meal. If the gojju is on hand, it is a breeze to make.

The Puliyogre gojju can be stored in air tight containers for upto a month. I keep it in the fridge sometimes but my mom never does and it does not grow mold or go bad.


Iyengari Puliyogre Gojju

Servings: Fills 1 Mason Jar/ Kissam Jam bottle
Prep Time: 2 - 4 hrs Cook Time: 1 hr

Ingredients

200 gms Tamarind (should yield 1.5 cups of juice)
3-4 cups of water
3/4 cup Sambhar powder or Rasam powder
3/4 cup Jaggery shavings

For Seasoning

3/4 cup Oil
1 1/2 tsp Mustard seeds
1 tsp Turmeric
4 Red Chillies
3-4 tsp Channa Dal
2 tsp Hing/Asafoetida
10-15 Curry leaves

Instructions


  1. Wash and soak tamarind in the water for 4 hours till it softens enough to squeeze to get the pulp. 
  2. Alternately wash and soak in water and microwave for 30 min bursts 2-3 times till it softens. Continue to soak for around 2 hours and then squeeze to get the pulp.
  3. Do NOT add too much water in the soaking process, else it takes a longer time to get the gojju consistency later. 
  4. Squeeze to get the pulp and then filter it using a tea filter (I found this easier) or cloth to get 1.5 cups of tamarind juice. It is a process which requires patience so have your favourite music on if that helps. 
  5. Once you have the filtered juice from all the pulp and if it is not yet 1.5 cups, add half a cup of water to the pulp, squueze some more, filter and get more juice. 
  6. If you have gotten this far, the tough part of the recipe is over so relax. 
  7. Heat oil in a heavy bottomed vessel and mustard seeds to  it.
  8. Once the mustard seeds splutters add all the seasoning ingredients one by one in the same order listed above.
  9. Fry for a minute making sure that the channa dal does not over brown. 
  10. Reduce the flame to low.
  11. Now add the tamarind juice to it slowly. It is best to slide it down the side of the vessel to avoid oil spurts.
  12. Stir the mixture and allow to boil. 
  13. Once it boils add the Sambhar/Rasam powder.
  14. Mix thoroughly.
  15. Add the jaggery and mix thoroughly.
  16. The mixture would have thickened by now but continue to boil while stirring occasionally. 
  17. It is done when it reaches the consistency of a thick gojju or idli batter. It takes approximately 40 minutes to get to this state
  18. Allow it to cool completely on the counter top before storing it in an air tight container.

Dill Semolina Upma (Rava Porridge with Sopsige soppu)


Dill is, I think, the queen of herbs and the gender bias is because not only does it look dainty and beautiful, it also smells extremely good! It not only lends a unique taste to whatever dish it adorns but also imparts a fragrance while cooking that lights up the kitchen. It is easy enough to use whether cooked (a quick saute) or raw and adds a flavourful dimension to the spread.
Upma is the quintessential quick one pot meal in many households across South India. It is the meal of choice for the lunch box and dinner atleast once a week in my house. There is an interesting equation in our house with respect to this dish. My brother loves it like he loves nothing else and my hubby's brother hates it like he hates nothing else! So when the twain meet, the cooks are left wondering whom to please! Each time my brother visited my house in the US, there would be uppit on the table for atleast one meal everyday.

Upma comes in many varieties. It can be made with semolina, vermiciilli, coarse rice flour (akki thari) or even leftover bread. Any vegetables that can be cooked can get into this dish. Raw vegetables are somethign I have never tried in an upma and I am not likely to. It can even be spiced up to one's palate with garam masala powder or freshly roasted and ground spices. Onion is a common fixture in upma, although leaving it out does not dampen the taste in any way.

This recipe is to make combine the aromatic dill and the tasty upma. Its easy to make and you need one pot to make it.


Dill Semolina Upma

Servings: 3
Prep Time: 15 mins Cook Time: 15 mins

Ingredients

2 cups Rava/Semolina (coarse not fine)
4 cups Water
1 bunch Dill leaves
1 medium Onion

For the seasoning

5 tsp Oil
1/2 tsp Mustard seeds
1/2 tsp Turmeric
3 Green chillies
1 tsp Jeera
1 tsp Channa Dal
1 tsp Urad Dal
2 tbsp Groundnuts / Cashewnuts

Instructions

Wash the dill leaves, remove thicker stems and cut it into fine shreds.
Heat a heavy bottomed vessel and roast the Rava in it till it reddens. This may take around 10 minutes on Medium heat. Make sure to not over brown them. It is time to stop when you start getting the smell from the roasted semolina. Keep aside on a plate.
In the same heavy bottomed vessel, heat the oil and add mustard seeds to it.
When the mustard seeds start to splutter, add the rest of the seasoning ingredients.
Saute for half a minute.
Now add onions and saute till transluscent.
Add the dill and saute for a few minutes till the leaves become tender.
Pour in the water, add salt and allow it to come to a boil. This is the time for a quick taste check to see if the salt is enough or more. If more, squeeze 2 tsp of lemon juice.
Pour the roasted semolina little at a time into the vessel while constantly stirring. Stir to avoid lumps.
The rava coagulates with the water to form a porridge consistency, mix well and cover and continue to heat on a very low heat for another 5 minutes.
Serve upma hot plain or accompanied by chutney or yoghurt.

Mar 6, 2013

Menasu Saaru - Pepper Soup - A tonic for cold and cough


It has been a week of insistent cough and drippy noses at my home thanks to the drastic weather changes that abound. T needed something soothing for his throat and asked me to make Menasu saaru that his mom makes. I had never made it before but since a request for a particular dish comes rarely from him I decided that I had to take the plunge. 
With a jog down his memory lane to remember what aunty, as I call her, lovingly puts in it and some searching on the internet, we came to a conclusion on what needs to go into this soup. 
It had to have pepper because the soup is named after it and also because of the antioxidants which relieve cold symptoms, dry cough and congestion. Cumin had to be in it for all its antiseptic properties which would aid in fighting against the cold. Garlic for the nice taste it would imbue into the concoction and also for its expectorant like effects for cough. Curry leaves for its wonderful soothing nature and also anti-bacterial nature. Red chillies for taste and maybe it helps get the bad stuff out. 

My mother makes a different kind of rasam for such occasions. Its called Molaga Chatambd which also translates to Menasu saaru or Pepper soup. But the taste is completely different although the curative properties are similar. I even store the powder on hand to use readily. I will post about it later. The

Menasu Saaru

Serving : 3 cups
Prep Time : 15 mins     Cook Time : 30 mins

Ingredients

2-inch ball of Tamarind
1-inch cube of Jaggery (use more if you like it sweet)
3 cups Water
Salt to taste

For the Seasoning

2 tsp Black Peppercorns
2 tsp Cumin seeds
2 cloves Garlic pods
Handful of Curry Leaves
2 Red Chillies
2 tsp Ghee

Instructions


  1. Soak the tamarind in warm water for around 15 minutes. 
  2. Once the tamarind softens, squeeze it further to get all the juice mixed up with the water. Do this for around 5 mins to extract all the juice. 
  3. Filter the tamarind juice either with your hand (fingers acting as the sieve) or use a tea filter (needs a lot of patience. 
  4. Place a heavy bottomed vessel on medium heat, add 3 cups of water and add the filtered tamaring juice to it. 
  5. Add the jaggery into it and allow it to boil for around 20 - 25 minutes. 
  6. As you boil, add more water if it becomes too tangy for your palate. 
  7. Add salt to taste.

To make the Seasoning


  1. Peel the skin of the garlic and crush it. I placed the garlic pod on a cutting board, placed the flat side of my knife on it and banged on it with my wrist. 
  2. Coarsely crush the peppercorns. I used a heavy stone against the peppercorns on my cutting board for lack of pestle and mortar. 
  3. Coarsely crush the cumin. Thank me for the heavenly smell in your kitchen after this. 
  4. Break the red chillies in half.
  5. Heat the ghee in a small wok on medium heat and add the pepper, cumin seeds, garlic, red chillies and curry leaves. Let it fry while you sti.
  6. Pour the seasoning on top of the boiled soup.
  7. This concoction can be had as soup or mixed with rice. In either case eat it while its eat. 


Feb 15, 2013

Uddin Vada

Craving. Drive. Closure.

 That would really define our Friday breakfast. For the whole day yesterday conversation around our house was centered around the Uddin Vada. Over the past year there has been a conscious decision on our part to cut down on the number of times we eat out. Also abetting this decision is the fact that the frozen, reheated stuff on offer in Indian restaurants here is below average. And there is only so much of pizza that one can eat. Moreover one doesn't trust Thai and Mexican food to be completely vegetarian. For T's birthday we decided to go dine at Cheesecake Factory to get that authentic American culinary experience. But I was left very disappointed by the size and rubbery feel of the patty inside the fall apart burgers. In a first of sorts we could not finish up the fries served on the side. I am very convinced that home cooked meals with twists once in a while is best even on the most exhausting days. Unlike the conventional idli, dosa as the time-saver meals in most south Indian houses, in ours there is always pasta to fall back on!


On all our visits to Indian restaurants, the mouth watering Uddin Vada had evaded us in a very big way. I think the last time I ate it was in St.Louis, more than a year ago, but it was so hard in the middle that it felt like eating cardboard.


Yesterday I found this video blog on making this crowd pleaser and geared up to give it a try. The recipe I tried came from here


Uddin Vada

Servings: 18-20 small sized ones (nearly 1/3 the size you get in Udupi Hotels in India)
Prep Time: 8 hrs (including overnight soak)  Cook Time: 1 hr

Ingredients

1 cup Urad Dal
1/2 cup Water
5-6 Peppercorn whole (optional, I forgot to put it in)
1 tsp Ground Black Pepper
1/2 tsp Asafoetida
1 tsp grated Ginger
Salt to taste

Instructions


  1. Wash (3-4 times under running water) and soak the urad dal overnight or atleast for 6 hours.
  2. Gring the urad dal into as fine a paste as possible using as little water as possible. I used less than half a cup of water to grind the soaked dal. Scrape down the sides of the mixie/blender jar multiple times while grinding. Patience is the key here.
  3. Add salt, ginger, pepper, asafoetida to the ground paste and mix with a spoon. Mix the batter with the spoon atleast 10-15 times to ensure the vada comes out light and airy and not hard. 
  4. Heat oil for frying in a heavy bottomed kadai.
  5. Dip your fingers into water and shake off excess from it. Now scoop a spoon of batter on the wet fingers. Flatten and Shape it using the wet thumb. Slowly spread your middle and ring finger and insert the thumb into the gap to make a hole in the center of the flattened batter. 
  6. Very carefully turn the hand upside down and drop the batter off into the hot oil. (If you had wet your hands, it should slide off easily. Take care not to have drops of water into the boiling oil!)
  7. Deep fry till golden brown. I kept the heat at a little less than Medium-High throughout. 
  8. Remove and pat excess oil down on a paper towel.
  9. Serve with coconut chutney. 
  10. Drinking hot filtered coffee to wash it all down is like using fork to eat pasta :)

Feb 24, 2008

Majjige Huli (Morkolamb in Tamil)


I havent posted here in a very very long time and believe me I really havent done any much cooking in the past 4 months. Yes, you heard it right. I have been taking my time to adjust to a newcomer in my life who is currently rolling around in me!
Today though necessity overwhelmed lethargy and I got down to the brass knacks and turned up a dish dear to T.

Majjige Huli is a great mix of the tangy, spicy and sweet. Its a curd based dish in which curd is the last ingredient to be added :)

What you need to make Majjige Huli
  • Many choice of Veggies including Pumpkin, Cucumber, Brinjal, Ladies Finger, Chayote(Seeme badnekayi in kannada), Ivy Gourd (Thondekayi in kannada), Beans etc
  • Kadlebele (Split yellow chickpeas) - 1 cup
  • Cumin seeds - 2 tsp
  • Turmeric - 1/4 tsp
  • Coconut - 1/2 cup
  • Green/Red Chilly -3-4
  • Salt to taste
  • Mustard seeds - 1 tsp
  • Oil - 1 tsp
  • Curd - 2 tbsp
Preparation to make Majjige Huli
  • Soak the kadlebele for atleast half an hour or till it becomes soft to the touch and breaks easily.
  • Grate the coconut
  • Grind soaked kadlebele, cumin seeds, turmeric, coconut and chilly to a paste with a little bit of water.
Method to make Majjige Huli
  • In case you are using Pumpkin or cucumber then cook in a vessel with water till soft. Add 1/2 tsp of salt while it cooks.
  • In case you are using Ladies Finger then fry it till the stickyness is gone. You could put a spoon of curd to fasten the process.
  • In case you are using Brinjal then fry it till cooked.
  • In case of other vegetables like you could pressure cook them
Once the vegetables are cooked, add the ground paste and allow it to boil. Add water as necessary to make it a thick gravy.
  • Add salt as required.
  • Allow it to cook till all the ingredients blend well.
  • Remove from flame.
  • To season, heat oil and add mustard seeds to it. Once it splutters remove from flame and add it into the gravy. Mix well.
  • Allow the gravy to cool completely and then add 2 tbsps of curd and mix thoroughly.


  • My fundas
    • Majjige Huli tastes best with Pumpkin. Ladies finger also is very good in it.
    • Makes for a soothing side dish with rice on a hot summer's day
    Related Posts Plugin for WordPress, Blogger...