Showing posts with label Main Course. Show all posts

Jul 19, 2013

Easy Eggless Pad Thai Noodles with Vegetables


Pad literally means Stir fried. Noodles are the easiest thing to dish up on a busy week day or night.
I made this to impress my m-i-l and onlya fter laying it out on the table did I get to know that she doesnt eat noodles. Pasta is ok but Spaghetti is not. Well, I got to try out a new recipe so there. Pad thai is usually served with crushed peanuts as a garnish. But I decided to incorporate the peanut flavour in the sauce itself by using peanut butter. Since this is the vegetarian version no question of using fish oil or eggs. Also replaced the rice noodles which is used in the classic dish with its whole wheat cousin. The whole wheat version does make the dish heavier. Mung bean sprouts are an important element in the dish but I havent used it since I was out of it.

Easy Eggless Pad Thai Noodles with Stir Fried Vegetables

Servings: 4
Prep Time: 10 mins   Cook Time: 30 mins

Ingredients

1/2 box of Whole Wheat Spaghetti Noodles
3 tbsp Peanut Butter
4 tsp Soy Sauce
1 tsp White Vinegar
1 tsp Lemon juice
2-3 tsp Maggi Hot and Sweet Tomato Chilli Sauce
2 tsp or more Red Chilli powder
2 tsp Garlic powder
1 tsp Black pepper powder
6 tsp Oil
1 Medium Onion julliened
1/2 cup Capsicum cut thin
1/2 cup Carrots cut thin
1/2 cup Mung Bean sprouts (I dint have it today)
Any other vegetables of choice
Salt to taste

Instructions


  1. Boil a pot of water, add some salt and drop in the noodles. Cook them according to the package instructions to al-dente. 
  2. Drain the noodles and keep aside. 
  3. In a bowl, mix the peanut butter, soy sauce, vinegar, tomato sauce, lemon juice, garlic powder, red chilli powder, black pepper powder.
  4. Heat the oil in a skillet, add in onions and saute till transluscent.
  5. Tip in the capsicum, carrots and other veggies and stir fry.
  6. Stir in the sauce mix and saute for a few more minutes. Adjust the salt.
  7. Fork in the cooked noodles and give it a good mix. 
  8. Serve warm.

Jun 27, 2013

Sweet Potato Curry - Spicy with a hint of sweet


Sweet potato supposedly has lesser calories, more fiber and more nutrients packed in it than the white potato. But as with a lot of vegetables the debate goes on. Debate not withstanding both the spuds are loved by my family The sweetness of the sweet potato is often off-putting for some in my family which forces us to choose the white variety many times but with the right kind of treatment the sweet potato can provide a stiff competition.
Its an easy curry to prepare and goes well with chapathis but I love it most with rasam rice. Great for the lunch box of a picky eater too.

Sweet Potato Curry - Spicy with a hint of sweet

Servings: 2 cups curry
Prep Time: 15mins     Cook Time: 10 mins

Ingredients 

4 sweet potatoes
1-2 tbsp Jaggery
1/2 tsp Mustard seeds
4-5 Green chillies
1 tsp Cumin seeds
2 tsp Chana Dal
1 tsp Urad Dal
Few Curry leaves
1 bunch Coriander leaves
4 tsp Oil
Salt to taste
3-4 cups Water

Instructions


  1. Boil the water, add some salt, turmeric and put in sweet potato halves.
  2. When the sweet potato is nearly cooked add in  the jaggery and continue to cook till sweet potato becomes tender to the touch. 
  3. Remove the sweet potato halves and peel the skin off and mash it. 
  4. Heat the oil in a heavy bottomed vessel and add mustard seeds
  5. When the seeds sputter add the cut green chillies, cumin seeds, chana dal and urad dal and fry for a couple of minutes. 
  6. Add in the mashed potatoes and curry leaves and mix well.
  7. Adjust the salt as necessary. 
  8. Switch off the stove and garnish with coriander leaves. 
  9. Serve with chapathis or rice. 

Jun 18, 2013

Masala Chana Dal with Kale


Kale is a wonderful green. Has an interesting look and a unique taste. I like baby Kale in salads but I usually cook the bigger leaves. Pesto comes out wonderful using Kale as I have tried here. Today for dinner I wanted to make a simple Dal dish using Chana Dal. This particular recipe is credited to my neighbour who had served it to us at dinner on the day we landed in Kansas. I could never forget the taste and is one of my favourite dal dishes since.Its a very simple dish akin to most Dal preparations and goes well with Chapathi or Rice. The vegetable best suited for this Dal is the bottle gourd but since I did not have it handy today, I decided to substitute it with a green. I picked Kale for no bigger reason than that was the first box I laid my hands on in the fridge. I am sure it would work very well with spinach or amaranth.

Masala Chana Dal with Kale

Servings: 2 cups
Prep Time: 10 mins Cook Time: 15 mins

Ingredients

1 1/2 cups Chana Dal
2 cups cut Kale leaves
1 small Onion
1 tsp Cumin seeds
1 tsp Cumin powder
1 tsp Coriander powder
1 tsp Turmeric
1 tsp Garam Masala
2 Green chillies
Salt to taste
3 tsp Oil

Instructions


  1. Remove the thick stem portion from the Kale leaves simply by tearing the leaves away from the stem. Wash thoroughly and cut or tear them into smaller size.
  2. Boil or steam the washed chana dal till half cooked. I used the pressure cooker and switched off the stove after one whistle.
  3. Heat oil in a heavy bottomed pan and add cumin seeds to it.
  4. Add in green chillies when the cumin seeds sputter and saute for half a minute.
  5. Add in turmeric and onions and saute till onions turn transluscent.
  6. Saute after adding cumin powder, coriander powder and garam masala and then add Kale.
  7. Cook till Kale wilts. Add salt at this point
  8. Now add the contents of the pan to the boiled/steamed channa dal and boil till cooked. I used the pressure cooker again. I added the pan contents to the half cooked channa dal inside the cooker and cooked till another whistle. 
  9. Make sure to not over cook the chana dal so as to mash them all up. The dal dish is done when the lentil retains its shape and is still soft to the touch. 
  10. Serve Masala Dal hot with Chapatis or Rice. 

May 23, 2013

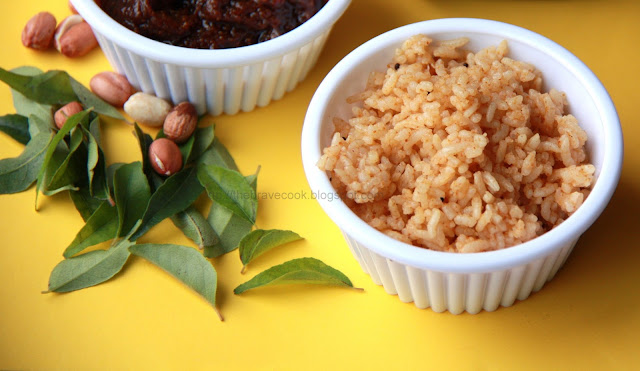
Iyengari Puliyogre Gojju


Raise your hand if you DONT love puliyogre. Raise if your hand if you DO. There I see more participation now!
Sometimes I feel the hubby married me only to be assured of constant access to this delectable dish which is so near to any Iyengari's heart. My mother has had a dream run because all she had to say was "Puliyogre" to have him at her beck and call. He also coaxed her to send some of her gojju with us to the US. But the only thing I do not understand in all this hullabulloo is why the hubby heats it before eating it. Ever heard of eating hot puliyogre but thats the only way he likes it! Pulioygre is the rice dish of choice on any festival day or special occasion in an Iyengari house. An Iyengari wedding caterer is judged solely on his Puliyogre making calibre to get repeat contracts. The judgement is even passed as a whisper throughout the wedding hall so people who come in later batches to eat are already equipped with the knowledge of whether to skip all else to conserve space for the Puliyogre or to avoid it entirely.

Puliyogre can easily be the only dish for a meal or one of the main course dishes in a bigger meal. If the gojju is on hand, it is a breeze to make.

The Puliyogre gojju can be stored in air tight containers for upto a month. I keep it in the fridge sometimes but my mom never does and it does not grow mold or go bad.


Iyengari Puliyogre Gojju

Servings: Fills 1 Mason Jar/ Kissam Jam bottle
Prep Time: 2 - 4 hrs Cook Time: 1 hr

Ingredients

200 gms Tamarind (should yield 1.5 cups of juice)
3-4 cups of water
3/4 cup Sambhar powder or Rasam powder
3/4 cup Jaggery shavings

For Seasoning

3/4 cup Oil
1 1/2 tsp Mustard seeds
1 tsp Turmeric
4 Red Chillies
3-4 tsp Channa Dal
2 tsp Hing/Asafoetida
10-15 Curry leaves

Instructions


  1. Wash and soak tamarind in the water for 4 hours till it softens enough to squeeze to get the pulp. 
  2. Alternately wash and soak in water and microwave for 30 min bursts 2-3 times till it softens. Continue to soak for around 2 hours and then squeeze to get the pulp.
  3. Do NOT add too much water in the soaking process, else it takes a longer time to get the gojju consistency later. 
  4. Squeeze to get the pulp and then filter it using a tea filter (I found this easier) or cloth to get 1.5 cups of tamarind juice. It is a process which requires patience so have your favourite music on if that helps. 
  5. Once you have the filtered juice from all the pulp and if it is not yet 1.5 cups, add half a cup of water to the pulp, squueze some more, filter and get more juice. 
  6. If you have gotten this far, the tough part of the recipe is over so relax. 
  7. Heat oil in a heavy bottomed vessel and mustard seeds to  it.
  8. Once the mustard seeds splutters add all the seasoning ingredients one by one in the same order listed above.
  9. Fry for a minute making sure that the channa dal does not over brown. 
  10. Reduce the flame to low.
  11. Now add the tamarind juice to it slowly. It is best to slide it down the side of the vessel to avoid oil spurts.
  12. Stir the mixture and allow to boil. 
  13. Once it boils add the Sambhar/Rasam powder.
  14. Mix thoroughly.
  15. Add the jaggery and mix thoroughly.
  16. The mixture would have thickened by now but continue to boil while stirring occasionally. 
  17. It is done when it reaches the consistency of a thick gojju or idli batter. It takes approximately 40 minutes to get to this state
  18. Allow it to cool completely on the counter top before storing it in an air tight container.

Feb 24, 2008

Majjige Huli (Morkolamb in Tamil)


I havent posted here in a very very long time and believe me I really havent done any much cooking in the past 4 months. Yes, you heard it right. I have been taking my time to adjust to a newcomer in my life who is currently rolling around in me!
Today though necessity overwhelmed lethargy and I got down to the brass knacks and turned up a dish dear to T.

Majjige Huli is a great mix of the tangy, spicy and sweet. Its a curd based dish in which curd is the last ingredient to be added :)

What you need to make Majjige Huli
  • Many choice of Veggies including Pumpkin, Cucumber, Brinjal, Ladies Finger, Chayote(Seeme badnekayi in kannada), Ivy Gourd (Thondekayi in kannada), Beans etc
  • Kadlebele (Split yellow chickpeas) - 1 cup
  • Cumin seeds - 2 tsp
  • Turmeric - 1/4 tsp
  • Coconut - 1/2 cup
  • Green/Red Chilly -3-4
  • Salt to taste
  • Mustard seeds - 1 tsp
  • Oil - 1 tsp
  • Curd - 2 tbsp
Preparation to make Majjige Huli
  • Soak the kadlebele for atleast half an hour or till it becomes soft to the touch and breaks easily.
  • Grate the coconut
  • Grind soaked kadlebele, cumin seeds, turmeric, coconut and chilly to a paste with a little bit of water.
Method to make Majjige Huli
  • In case you are using Pumpkin or cucumber then cook in a vessel with water till soft. Add 1/2 tsp of salt while it cooks.
  • In case you are using Ladies Finger then fry it till the stickyness is gone. You could put a spoon of curd to fasten the process.
  • In case you are using Brinjal then fry it till cooked.
  • In case of other vegetables like you could pressure cook them
Once the vegetables are cooked, add the ground paste and allow it to boil. Add water as necessary to make it a thick gravy.
  • Add salt as required.
  • Allow it to cook till all the ingredients blend well.
  • Remove from flame.
  • To season, heat oil and add mustard seeds to it. Once it splutters remove from flame and add it into the gravy. Mix well.
  • Allow the gravy to cool completely and then add 2 tbsps of curd and mix thoroughly.


  • My fundas
    • Majjige Huli tastes best with Pumpkin. Ladies finger also is very good in it.
    • Makes for a soothing side dish with rice on a hot summer's day
    Related Posts Plugin for WordPress, Blogger...